In previous post I wrote about several possibilities to automate tasks in Azure. In this post I will show you an additional possibility to automate tasks in a cloud native environment with the help of Automation Account.
Introduction
Companies have often the requirement to have a Catch-All email setup. This means that each email address in an organization where no mailbox exist gets forwarded to a specified mailbox, eg. info@example.org. If you want to setup your environment to support Catch-All follow the instructions on https://o365info.com/configuring-catch-all-mailbox-in-office-365-part-1-of-2-2/
This blog post is now about the functionality that you can send emails with such a Catch-All address. It sounds easy; but in reality you have to do multiple steps before you are able to send emails with such a Catch-All address:
- Enable OWA to show
Fromfield so you are able to select a different sender address - Add specific Catch-All address to the specific user mailbox
The first task is a one-time setting and is easy done and can be read here - but task 2 has to be done for every Catch-All address you want to use. This is a tedious task and perfect candidate for an automation.
In the following description following assumptions are made:
- Recipient domain is
plnx.ch - Catch-All setup for Exchange Online is done, recipient mailbox is
rOger@plnx[.]ch
Implementation
It is always a good idea to make a plan what and how you want to achieve a goal. Here is the plan:
- Fetch email addresses targeted in the recipient domain
- Check if one of those email addresses does not exist
- If such an email address is found add it to the given recipient mailbox This procedure gets repeated as an example every day.
graph LR
A[Fetch email addresses] --> B(email address does exist)
B -- No --> C(Add email address)
B -- Yes --> B
subgraph for each email address found
B
C
end
Another great tip is to create your PowerShell code first locally. It is easier to debug and your are faster to fix stuff. Of course you have to do some adaption, eg. Managed Identities are not available - but you can replace it with your or an specific account with proper permissions during development.
The PowerShell code
Here is the basic PowerShell code to accomplish the tasks I outlined above. You can test it locally from your local PowerShell environment. As prerequisits following modules have to be installed: ExchangeOnlineManagement (at the time of writing version 3.1.0).
To use this PowerShell you need:
- API Permission:
Exchange.ManageAsApp(to add email addresses to recipient mailbox) - Assigned Role:
Exchange Administrator(needed to manipulate email addresses)
# PowerShell Script to check Exchange Online Message Traces for new Email Addresses
$emailDomain = "@plnx.ch"
$sender4alias = "rOger@plnx[.]ch" # of course replace [.] with .

Connect-ExchangeOnline -UserPrincipalName <admin account>
# Connect-ExchangeOnline -ManagedIdentity -Organization <tenant-name>.onmicrosoft.com

$todayDate = Get-Date
$yesterdayDate = (Get-Date).AddDays(-1)

$emailAddresses = ""
$mailboxes = Get-Mailbox

# Get all existing email addresses in organization
foreach ($mailbox in $mailboxes) {
    foreach ($emailAddress in $mailbox.EmailAddresses) {
        if ($emailAddress.toLower().StartsWith("smtp:") -and $emailAddress.toLower().EndsWith($emailDomain)) {
            $emailAddresses = $emailAddresses + $emailAddress.toLower() -replace "smtp:",""
            $emailAddresses = $emailAddresses + "`n"
        }
    }
}

# Fetch email addresses targeted in the recipient domain
$messages = Get-MessageTrace -StartDate $yesterdayDate -EndDate $todayDate -RecipientAddress "*$emailDomain"

foreach ($message in $messages) {
    $recipient = $message.RecipientAddress.toLower()
    if (!$emailAddresses.Contains($recipient)) {
        Write-Host "$recipient DOES NOT exist; we add it to recipient mailbox!"
        Set-Mailbox $sender4alias -EmailAddresses @{add=$recipient}
    }
}

Disconnect-ExchangeOnline
Simple, isn’t it?
Automate it in the Cloud
Due we have now the basics the next step is to get it up and running in the cloud. This can be divided again in steps:
- Prepare and activate an
Automation Accountincl.Managed Identity - Add required modules (additional ones which are not available by default)
- Assign proper permission and roles to the
Managed Identity - Create a
Runbook - Create a
Schedule
Prepare Automation Account
- Log in to Azure Portal https://portal.azure.com/
- Search for
Automation Account - Create a new one:
- Basics
- Specify Subscription
- Specify a resource group
- Specify a automation account name:
aa-exo(I use a single Automation Account for all Exchange Automations) - Specify a region
- Advanced
- Managed Identities:
System assigned(should be pre-selected)
- Managed Identities:
- Networking
- Connectivity configuration:
Public access(should be pre-selected)
- Connectivity configuration:
- if validation passed hit
Create
- Basics

Automation Account creation.
Add required modules
By default only some default PowerShell modules are pre-installed. Due we operate with the ExchangeOnlineModule we have to install it so it is available in our PowerShell script.
Go to your Automation Account aa-exo:
- Navigate to
Modules - Hit
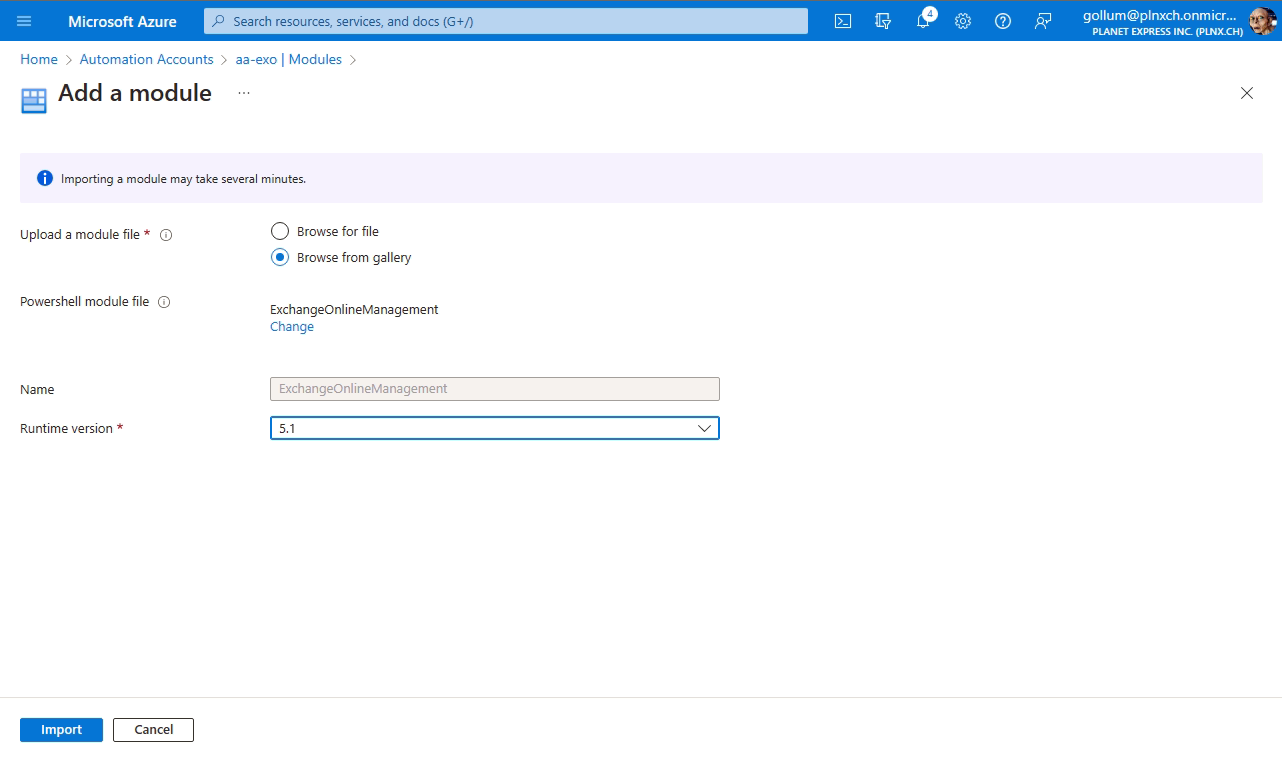
Add a module- a new window appear:- Upload a module file:
Browse from gallery - Powershell module file: Hit on the link
Click here to browse from galleryand search for moduleExchangeOnlineManagement - Specify runtime version (must match your PowerShell version):
5.1in our case - Hit
Import- it will take some time until module is imported
- Upload a module file:
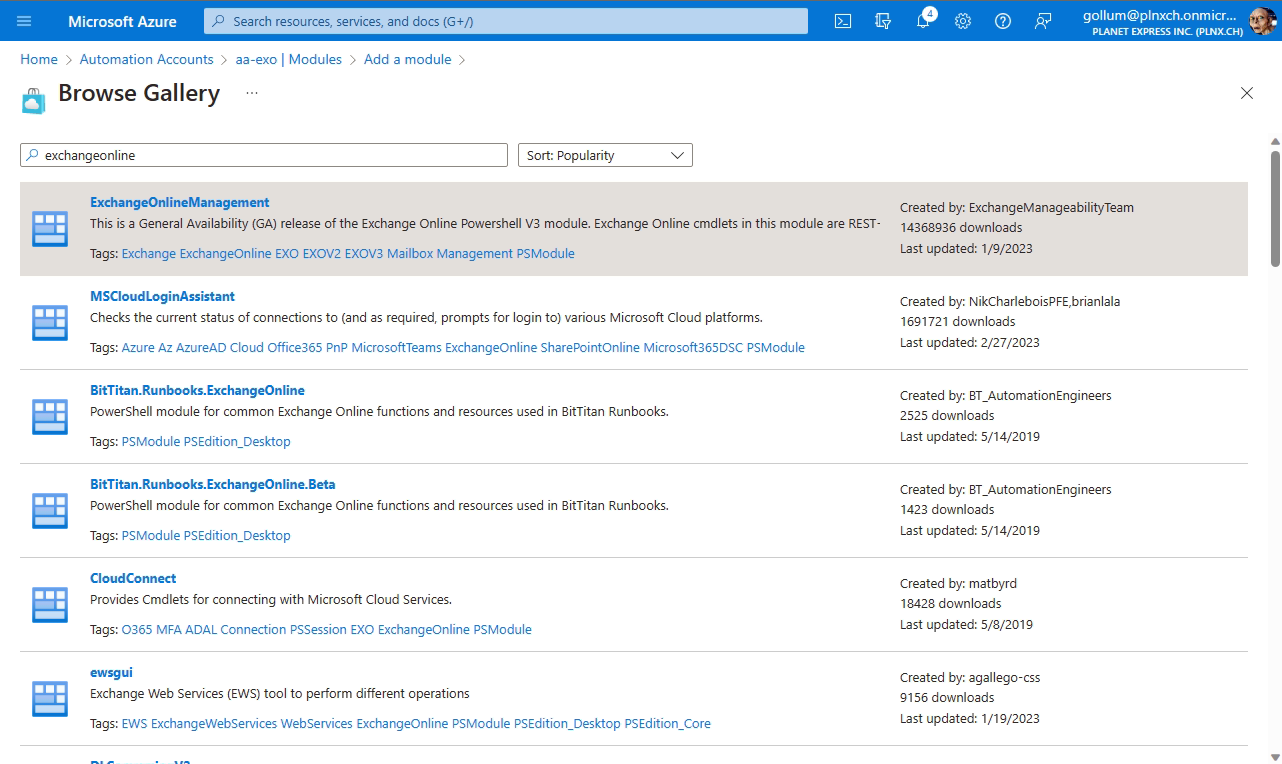
ExchangeOnlineManagement and click on it, then hit Select.
Import to finish adding module.

Available. In the screenshot you see Importing - you have to wait until import is finished.
Assign permissions and roles
Use the following script to assign required permission to your Managed Identity (replace the one in the script with your Id).
$managedIdentityId = '8396e306-2331-3422-8b47-f23dfbeefadf'
$myPermissions = "Exchange.ManageAsApp", ""

Connect-MgGraph -Scopes 'Application.ReadWrite.All,AppRoleAssignment.ReadWrite.All'

$msi = Get-MgServicePrincipal -Filter "Id eq '$managedIdentityId'"

$exo = Get-MgServicePrincipal -Filter "AppId eq '00000002-0000-0ff1-ce00-000000000000'"

foreach ($myPerm in $myPermissions) {
  $permission = $exo.AppRoles `
      | where Value -Like $myPerm `
      | Select-Object -First 1

  if ($permission) {
    New-MgServicePrincipalAppRoleAssignment `
        -ServicePrincipalId $msi.Id `
        -AppRoleId $permission.Id `
        -PrincipalId $msi.Id `
        -ResourceId $exo.Id
  }
}

Disconnect-MgGraph
As final task you have to assign the role Exchange Administrator to the Managed Identity.

Exchange Administrator to our Managed Identity aa-exo.
Create Runbook
- Navigate to Runbooks
- Select
Create Runbook - Fill in necessary information:
- Name:
ExoCheckNewAliases - Runbook type:
PowerShell(due we just use a plain PowerShell) - Runtime version:
5.1(of course you should use a newer version; but I had some troubles last time using eg. version7.1) - Description: Adding a nice description is a good habit
- Name:
- Hit
Create

Now you get an editor where you can fill in your code. Just paste the code from above into the editor.
Make sure that you change the following lines in your code (comment out authentication with user account - activate authentication with Managed Identity):
...
# Connect-ExchangeOnline -UserPrincipalName <admin account>
Connect-ExchangeOnline -ManagedIdentity -Organization <tenant-name>.onmicrosoft.com
...

If you edit a Runbook you have to make sure that you save it. Then you can switch to the Test pane to make a test run. If you are happy with your test run you can close the Test pane and Publish the new runbook. From that point on the new Runbook will be used (if already referenced from a Schedule - see below).
Create Schedule
Now as last piece you have to create a schedule so your Runbook gets called in defined intervals. After you created your schedule you have just to link it to your Runbook and you are done.
- Navigate to Scheudles
- Select
Add a schedule - Fill in necessary information:
- Name:
Every Hour - Description: Give an appropriate description
- Starts: let the filled in start date
- Time zone: does not matter for our scenario
- Recurrence:
Recurring - Recur every:
1 Hour - Set Expiration:
No
- Name:
- Hit
Create


Every Hour.
Now you have to link your Runbook to the schedule:
- Navigate to your
Runbook - Hit on
Link to schedule - Select your created schedule
Every Hour - Hit
Ok

Runbook.
Final result
Now we have a PowerShell script running Cloud native with a Managed Identity in use which is using Automation Account. Everytime you get an email to an non existing email address due your Catch-All configuration automatically an alias address (or so called proxy address) is added to the given account.
FAQ
What costs will be generated?
Up to 500 minutes runtime per subscription is free of charge. The consumption is depending on your schedule and size of your organization.
A simple example: if the runtime is one minute and you let the PowerShell script run every hour it will use 1 min/run x 24 hours/day x 30 days you will consume approximatly 720 minutes; 500 minutes are free so you will be charged for 220 minutes (typical $0.002/minute ) $0.44 per month.
Why not using Logic App?
The reason is simple: even accessing message trace logs is possible from an Logic App by using raw HTTP calls it is not possible to add email proxy addresses (there is no public API available for that, Graph API has only Read-Only access to this property).
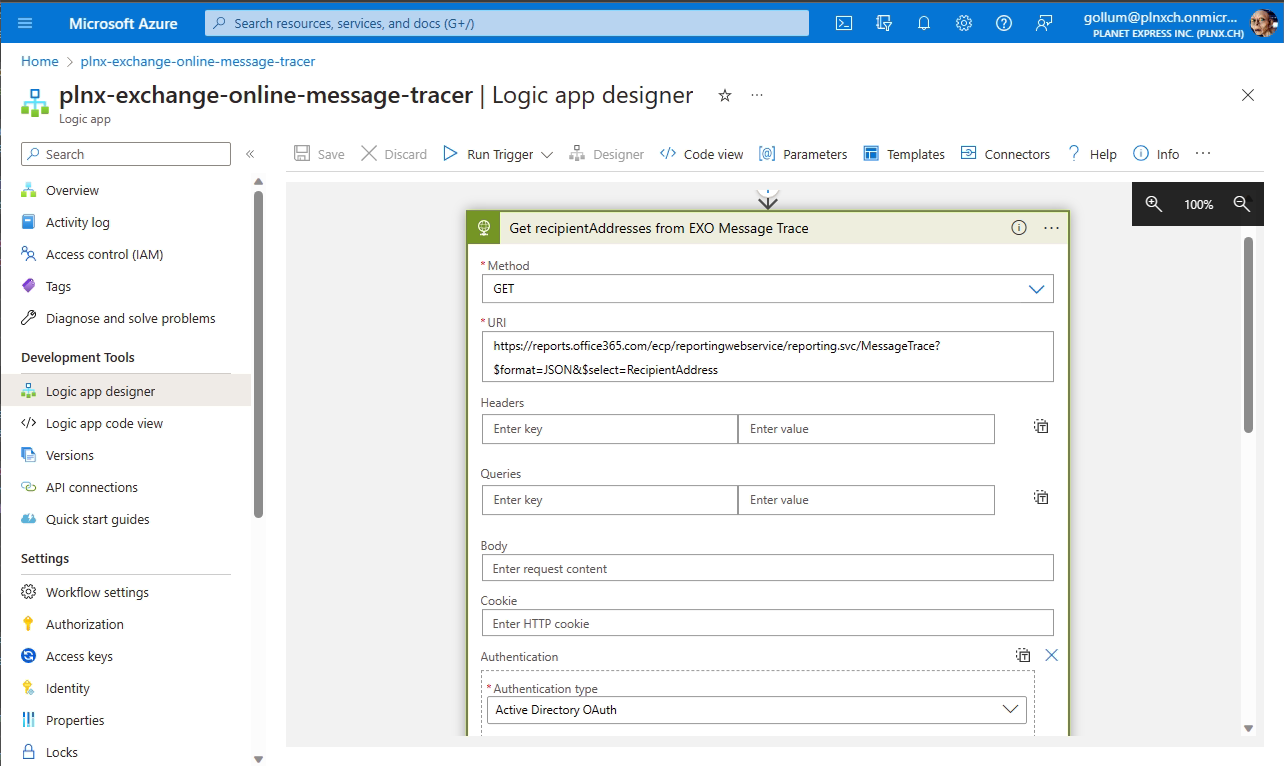
Corresponding Web URL to fetch data: https://reports.office365.com/ecp/reportingwebservice/reporting.svc/MessageTrace?$format=JSON&$select=RecipientAddress
How to determine which roles needed for specific Cmdlet?
For required Exchange Online Roles use the Cmdlet Get-ManagementRole. Below you see the calls for Cmdlets Get-MessageTrace and Set-Mailbox.
It is always good practice to use least privilege to fullfill a task.
PS C:\Users\rOger> Connect-ExchangeOnline -UserPrincipalName <admin account>

PS C:\Users\rOger> $perms = Get-ManagementRole -Cmdlet Get-MessageTrace
PS C:\Users\rOger> $perms

Name                 RoleType
----                 --------
Compliance Admin     ComplianceAdmin
Data Loss Prevention DataLossPrevention
Security Admin       SecurityAdmin
Security Reader      SecurityReader
View-Only Recipients ViewOnlyRecipients

PS C:\Users\rOger> $perms = Get-ManagementRole -Cmdlet Set-Mailbox
PS C:\Users\rOger> $perms

Name                 RoleType
----                 --------
Audit Logs           AuditLogs
Legal Hold           LegalHold
Mail Recipients      MailRecipients
MyBaseOptions        MyBaseOptions
MyMailboxDelegation  MyMailboxDelegation
MyProfileInformation MyProfileInformation
MyDisplayName        MyProfileInformation
Public Folders       PublicFolders
Reset Password       ResetPassword
Retention Management RetentionManagement
User Options         UserOptions

PS C:\Users\rOger>
Minimal Exchange Roles
As you saw the Automation Account needs extensive rights to operate on mailbox settings. Note that on Exchange following roles would be sufficient:
Mail Recipients(to manipulate email addresses)View-Only Recipients(to fetch message trace)
But unfortunatly those are not dedicated available to be assigned to a Managed Identity. Probably someone has a hint how to do it?
PowerShell Error regarding interactive prompt
If you encounter an issue regarding an interactive prompt to fetch additional files add following line at top of the PowerShell script:
$ConfirmPreference = "None"
References and further reading
Here are some links:
- Enable Catch-All functionality in Exchange Online: https://o365info.com/configuring-catch-all-mailbox-in-office-365-part-1-of-2-2/
- Microsoft Announcement regarding sending from email aliases: https://techcommunity.microsoft.com/t5/exchange-team-blog/sending-from-email-aliases-public-preview/ba-p/3070501
- Enabling
Fromfield: https://teamwork.constructor.university/pages/viewpage.action?pageId=61113141#Howtoactivate/showtheFromFieldinOutlookorOutlookWebApp(OWA)-OutlookWebApp(OWA) - Pricing
Automation Account: https://azure.microsoft.com/en-us/pricing/details/automation/ - Use Managed Identity with module
ExchangeOnlineManagement: https://learn.microsoft.com/en-us/powershell/exchange/connect-exo-powershell-managed-identity?view=exchange-ps